Pages

Sunday, January 30, 2011

My First Award!!

YAY I have received my very first award!!  Thank you so much to Annissa over at A Page in My Book for this awesome award!!  


Here are the rules for acceptance of this award:
1. Thank and link back to the person who awarded you the award.
2. Share 7 things about yourself.
3. Award 15 other bloggers.
4. Contact these bloggers and tell them about the award.

Seven things about me....that relate to sewing lol...

1) My current sewing room is what used to be my "eat in kitchen".  I am planning to convert my kids playroom into my sewing room eventually....hopefully soon.

2) I have a Brother CS-8060 sewing machine which is nice - but the little thread cassette thing can be really annoying at times.  I'm getting a NEW machine, a Brother PC-420, when I get taxes back which should be in late February.

3) Not a single person in my family sews on a regular basis - my grandmother didn't even sew!  She did crochet though, and she taught me a little of it which is another thing that's on my to-do list.  No one is really crafty or creative either, so I'm not sure where I got it from.

4)  My 7 year old daughter (Pickle) is obsessed with Billy the Exterminator.  Not sure how that relates to sewing but I just thought I'd throw that out there lol.

5) I ordered a kit today from www.quiltsforkids.org which is an awesome organization - check it out!!  I can't wait to make my first quilt for such a wonderful cause which is dear to my heart.

6) I have pricked myself at least 500 times in the past month with pins lol.  I have to laugh at myself everytime I do it because it's so me.

7) I ordered 3 charm packs from www.missouriquiltco.com and they are precious!  Can't wait to use them.  Oh and I ordered a dresden tool from them as well.  I think dresden plates are so beautiful!

Now for the hard part....awarding 15 other bloggers!!  I don't think I even KNOW 15 other bloggers LOL!!  But I'll try!

15 Bloggers to whom I have bestowed this award:
A Flowered Purse - One of my dearest friends, a truly beautiful person
CraftyGemini - A wonderful teacher and my favorite vlogger ever!
Missouri Star Quilt Co. - Love their daily deal!!  Got a charm pack for 97 cents!  AND they give you reward points each time you shop so you basically are getting paid to shop with them - love it!
Quilts for Kids - Wonderful organization!! 
Moda Bake Shop - I could spend HOURS here!  Love Moda fabrics too!
The remainder of these blogs are ones I found randomly - haven't fully checked them all out but they look very cool!
Lazy Gal Quilting
Kate's Arty Bits Blog
crazy mom quilts 
You SEW Girl
QuiltNut Creations
A Quilting Life
Quilt Soup Blog
Wish Upon a Quilt 
Quilt Dad 
p.s. i quilt


Freezer Paper Raw Edge Applique Tutorial

Freezer Paper Raw Edge Applique Tutorial

This is just a basic tutorial on using freezer paper to do raw edge appliqué.  It has many uses…you can use it on pretty much any sewing project from quilting to garment making, so it’s really versatile.  Raw edge means that the edge of the fabric is visible, which if the fabric will be washed, will give it a scruffy look which some people like.  If you’d rather have nice smooth edges, well that’s another tutorial that I’ll do later.
Freezer paper is usually easy to find in the tin foil/Ziploc bag section of the grocery store or Walmart.  I love it because it’s very easy to use – NO mess, and you can save the templates you make and even reuse them!

For this tutorial you will need:
Freezer paper
two fabric scraps
scissors
iron
pencil
sewing machine and thread (or you could hand sew it)
8” piece of ribbon (optional)
small button (optional)
spray starch (optional)
hand sewing needle or glue to attach the ribbon/button (optional)

So let’s get started….

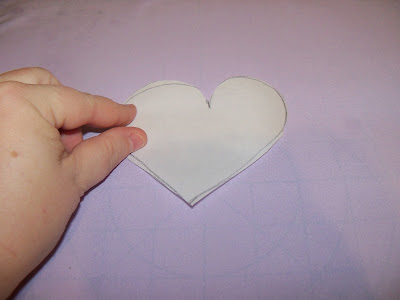
The first thing you’ll need to do is take some freezer paper and observe that it has a shiny side and a dull paper-ish side.  Think of the shiny side as the “glue” side.  The paper side is what you want to write on.  So first draw your appliqué piece.  I chose a heart.  Keep in mind that if you are doing letters, you will want to write them backwards because it will be a mirror image!  You’ll see what I mean in a bit.

Next take your fabric scraps and spray them with a little starch and then press.  This will get out the wrinkles and give you nice crisp fabric pieces to work with.

Cut out your design from the freezer paper and place it onto one of your fabrics, shiny side DOWN onto the WRONG side of the fabric.  This is important.

Now hit it with a hot, dry iron for a few seconds.

Once you do this, let it cool for a second unless you want to burn your fingertips like me lol.  You'll notice that the paper is now stuck to the fabric.  YAY that's what we want!  Now just cut out your design around the freezer paper.

As you can see here, one side is the paper, the other side is the RIGHT side of the fabric.

Now we simply peel off the freezer paper - no stickyness, no mess!

Now at this point you can label your "template" if you want to and set it aside in case you want to use it later.  The shiny side wont be as shiny as it was, but you should be able to get some more use out of it.

Now just lay your heart design onto your other fabric.

pin that bad boy down...

Take it to the sewing machine (or hand sew it)

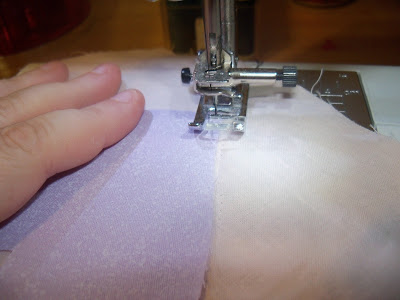
When you reach a curve, be sure to lift the presser foot (with the needle down) and turn the fabric slightly...

Put the presser foot back down and continue.  Rinse and repeat until you get back to where you started.

I chose to do a few different stitches just to show you some different looks you can get depending on the stitch you use.  I'll show you which ones I used in a minute.  But first, we have a problem.  There are two ugly threads hanging off the front of our pretty little design!  

We can fix that!  Just turn it over and pull gently on both of the back threads.  You'll notice that it forms a tiny loop.  Use your seam ripper or something else sharp and pull on that loop.

And voila....all 4 threads are now at the back.  You can clip them or tie them and then clip them, as I did here.

Now you can see the various stitches I used.  Zig zag stitch which is one of my favorites, then a blanket stitch and then a straight stitch.  If this were a real project, I wouldn't do that lol....nor would I use black thread...nor would I have cut out such a hideous looking heart!  But this was just a quick thing for me to show you how to do it....I ended up giving the final product to my girls.

Now just take it to the iron and press it to set those seams in place.  

As a final touch, you can let your imagination run wild!  I decided to attach a little ribbon and button with needle and thread by hand, but you could also glue it if you wanted to.  Or omit it altogether!  Wouldn't this make a cute quilt block....pot holder....something?  If it were done right I mean.  And it took just a few minutes!  I really love applique - the possibilities are just endless!!  Here are a couple of other things I made with applique recently.....
Seahorse purse for my Banana.  The seahorse, eye, cheek and flower are all applique pieces.  I wish I could say I drew this design myself, but no....I just googled.

Same goes for this one - not my original design.  But isn't she darling?  This was for my other daughter, Pickle.  There are 12 separate pieces to this applique - it was alot of work!!  Then some machine stitching and hand stitching to finish it off.  So as you can see, your applique designs can be simple or they can be elaborate.  No matter what, I think it's alot of fun and I plan to use alot of applique in my projects!!  I don't really feel like much of a noob anymore lol.  I'm still learning of course!  But I feel like I have a really good handle on things now!


Thursday, January 20, 2011

Hooooo Loves Ya Baby?

I'm so proud of myself.  I have fallen in love with applique cuz there is just sooooo much you can do with it!!  I made this tonight....it's super cute and I just adore it.  It is my own design...no tracing involved...I drew everything myself.  The only thing I copied was that I went to google and looked to see how to make the owl, but I didn't trace anything - I just did my own design based on various ones I saw that I liked.  :)  I think it turned out pretty well!  There are a few changes I would make but not that many honestly!  I love owls, and this is my husband and I as owls in looooove.  :)  Oh and it's a plain green table runner that I found at a thrift store and just added all the applique to it.  I would use it as a runner but I know my kids and/or cats would destroy it and it would just break my heart, so I am hanging it safely on the wall in my sewing room lol.


ETA:  I am going to be doing a tutorial on how to do applique very soon.  I am having problems with my digital camera so its a real pain in the butt to get pictures off my camera at the moment.  Took me about 30 minutes just to get these ones.  *sigh*  So as soon as I remedy that problem, I will be posting a couple of tutorials on things I have learned lately.  I'd really like to do a video tutorial at some point but for now it'll just be pictures.

Monday, January 17, 2011

The Dress of Stress

So my 17 year old niece wanted me to make her a dress.  I told her I would probably suck, and we needed to find a really simple pattern because of my very limited skills.  So we found a pattern labeled "easy" and bought a zipper, some hooks and eyes that it required and some frilly lace stuff.  We didn't even know which fabric we would use when we bought the pattern.  Anyway, I came home and got started on it.  Yeah....boy did I.  Let's talk about this, analyze this for a moment.  I basically know nothing about patterns, how to read them, etc.  So I laid out the fabric, cut out the fabric pieces it said we needed, things were going relatively smooth.  But then it said something about markings....which I didn't know anything about.  Also something about notches, which I knew you had to snip them but that's all I knew.  I followed the directions the best that I could.  The dress had basically two components...the bodice and the skirt.  The bodice was actually the easier of the two, believe it or not.  The skirt was really difficult to get things to match up.  I had a really hard time with this.....REALLY hard....and I thought several times "Who would put themselves through this....and WHY?"  LOL.  Then of course I had to "fit it" on her and make adjustments.  So a career as a fashion designer is probably not in my future lol.  I think I'll stick to quilting and making home decor things, things that are more cut and dry.  Maybe I'll attempt to make another outfit in the future - I really need to learn more about patterns first though.  But for my VERY first item of clothing EVER.......I think it turned out "decent".  The ruffle things at the bottom were not part of the pattern....they happened by accident but my niece liked the look of it, so we left it as is.  And she's wearing her pants and sneakers in the picture for some crazy reason.  Also I have no snipped any of the threads yet - they had to leave and I was rushing to get the last few things done on it so I told her to just trim it when she gets home.  I am not gonna lie - this was hard to do lol.

giving me a statuesque pose

yes, the back looks rather sad lol


Well I guess it could have turned out alot worse lol.  My next project is going to be a pillowcase dress for each of my daughters - hopefully it'll be a lot simpler!

Thrift Stores = My New Best Friend!

I've been going to thrift stores for years.  I used to buy things and then sell them on ebay.  I've also always found that one man's trash is another man's potpourri - what is that?  I dunno it's some kind of soup.  Cheesy GRINCH reference thrown in there.  :/ LOL.  Anyway, back to my story....wait what was I saying?  Oh yeah...thrift stores!  So I guess I never noticed before because I wasn't looking for it, but thrift stores have an abundance of fabric.  Some in the form of sheets....which is fine with me....and usually for 50 cents to $2.00 depending on the store and the fabric!  I have spent about $30 in the past 2 days at two different thrift stores and I feel like I got $300 worth of material lol.  I'm hooked now....so my hubby's paycheck better WATCH OUT!  Here's what all I got.  It doesn't look like much, but it is - trust me!!  There's no telling how many yards of fabric I have here!  Oh and excuse the mess...I tried my hand at sewing an actual GARMENT for my niece....a dress....from a pattern.....and well....results of my efforts will be in the next post.


Thursday, January 13, 2011

Weighted Blanket for Autism - for my BFF's Son

So my bestest friend, Annissa, (A Page In My Book) has a son who was diagnosed with Autism Spectrum Disorder today.  It's something she suspected for a while, so it's not a big shock to her family, but still it's something that no parent wants to hear.  When she got home, she asked me if I could possibly use my newfound sewing skills to make some sensory items for her son including some weighted blanket or something similar.  I of course was more than willing!  A) she's my best friend and a wonderful friend at that and I would do anything for her and B) I need the practice because I'm still learning - though I have to admit I am getting much better!  You can read more about her son, Nathan, and his medical concerns as well as her three other beautiful sons over at My Unique Flowers

Here are the three items I made for Nathan tonight and I'll be mailing them out to her tomorrow.  I hope he enjoys them and most of all, I hope that they help him!

This is a long tube, about 18 inches by 3 inches and it was supposed to have been a snake but I forgot to add a face lol.  Right now I'm using scrap fabric for these things but they are mainly things for her to "test out" on Nathan and get an idea of what works and what doesn't.  That's why I made three different things for him.  This one is already filled up with rice.


I know this dinosaur is ugly lol.....but I made it really fast and didn't exactly measure or anything, I was just winging it with some scraps.  She said he wont mind lol.  She told me he loves dinosaurs so I figured I would make him one as a little treat.  I left this unfilled so she can fill it with whatever she wants and then hand stitch it closed.


And this has to be my favorite thing I have made so far!  The fabrics are not exactly little boy fabrics, but again...these are for him to test out before I make stuff with nicer fabric.  As you can see, it's about 12 x 12 inches roughly, it's meant to be a lap blanket.  He's pretty small, so this should be about the right size for him to cuddle up with.

Close up on the stitching around the letters.  The blue fabric is ironed on and then stitched on and so are the letters.  Again, I left an opening for her to fill it with beans or rice or whatever she wants.  She can also add lavender or other calming scents to it if she wants to, and then just hand stitch it closed.  I would have liked to added buttons or zipper or velco but I had none of those on hand, except a zipper which I haven't figured out how to attach one yet and this was so beautiful I didn't want to go messing it up lol.

All three of Nate's gifts!  I hope you love them sweet boy!!

Exciting News!

So I am suuuuuper excited because I have decided to order a brand new sewing machine that's like THE sewing machine of all sewing machines!!  It's a Brother PC-420 and it's sooooooo awesome!!!  Here's a pic:


Isn't it wooooooooonderfuuuuuuuuuul???  :)  It has soooooo many features that I cannot wait to get my grubby little hands on.  A knee presser foot lifter....automatic thread cutting.....294 stitches.....TONS of presser feet that are included with it including ones for quilting/embroidery.  I mean....its really DA BOMB.  It's also about $500 lol.  But I can do so much more with it than I can with my current machine.  Don't get me wrong, I love the one I have an it's wonderful - also a Brother - but this new one has ALL the bells and whistles and then some.  I cannot WAIT to get it!!

Tuesday, January 11, 2011

Little Mini Scrappy Quilt

So here's my latest project.  I have found two things...one, I need a walking foot or open toe foot or both.  Two, I need more fabric, and lots of it!  Therefore, this mini quilt is unfinished until I get one, because I keep tangling my thread and I'm afraid my needle will break unless I get one.  So I can do the quilt top, backing and make my quilt sandwich, but that's as far as I can get because at that point its just too thick to run it through with my regular feet.

I'm really enjoying quilting!  It's fun, relaxing, and I can be really creative.  So far the projects I've made haven't been from any patterns.  I just used my scrap material and my imagination.  I can't wait to make a BIG quilt, but of course I need alot of fabric for that, so it'll just have to wait I guess.  I'm definitely improving.  Still not perfect, but I'm okay with that.  Right now I'm mostly making small projects that I can just practice with.

So here's my latest....unfinished....
Okay the whole quilt top measures about 12 x 12 inches.  There are 16 blocks, 8 different fabrics.  Each block is 2 inches square.  Then there is a 1/2 inch border around that, which I screwed up on a little bit, and around that is a 2 inch border.  The binding will be the same blue fabric that makes up the inner border.  

Which is the same fabric I'm using for the backing....only because I didn't have enough of any of the other fabrics for the backing lol.  I have discovered modabakeshop.com and I'm really anxious to order some fabric from there so I can make a big quilt!  I have a couple of projects I want to do.  I want to make something for my BFF but I have to wait a little bit on that because of the fabric issue.  :/  And my husband wants me to make a quilt for him lol.  And I want to make a couple of table runners, some placemats, etc. because I'm getting a new kitchen table soon!!  Oh and I want to make a wall hanging to go above my mantle but I need to measure the space first.  Also want to make my girls a small quilt each, a dog bed for my Sophie....lol....I have alot of projects in mind.  Just need some fabric!!  Oh and that quilting/walking foot!

Monday, January 10, 2011

A Cute Hotpad & New Toys

So tonight I decided to take pictures of my new toys!  This is just a small sampling of the stuff I got at Joann's (spent way too much but it was worth it!).

What you see here is my thread variety pack with various colors, a pincushion wrist band which is sooooo handy, I adore it!  In front of that is my marking tool.  Under there you have my clear ruler (awesome) and then my cutting mat which also serves as an ironing pad!  The white side (which you see here) is for pressing/ironing and if you flip it over there is the green cutting mat which is awesome and I love it!!  I also got some fabric, batting, fusible web, can't remember what else lol.

So this is my newest project.  It's a quilted hotpad (potholder).  The front has two solid blocks and two print blocks put together in a 4 square pattern, and the heart is actually appliqued on!!  It was actually pretty easy to do.  I wish I had chosen a different decorative stitch to go around it, but we live and learn.  :)  The binding, I made myself and just basically "winged it" so it doesn't look that great, but considering I didn't really know what I was doing....I'd say not bad lol.  I'm happy with it and I think it's super cute!


This is the backside....no applique, otherwise its the same as the front.

My hotpad in action!!  :P  I didn't use thermal batting so I can't technically use it as a hotpad.  Well I could, but it probably wouldn't do its job lol, so its just for decoration.  I might actually hang it on the wall as a mini quilt because I think it's cute.  I love the possibilities with applique and I cannot wait to get some more fabric and play around with it!!  I have alot of ideas!  The next one I made, I'll do a tutorial.  

Coasters For a Friend

A good friend of mine asked me to make her some quilted coasters, so I decided to let that be my first quilting project!  It took a long time and I learned from alot of mistakes lol, but I finished them and they look pretty cute and serve their purpose, even if they aren't perfect.  :)  I know my friend, Dianna (http://afloweredpurse.blogspot.com) will love them, cuz she loves me!!  LOL.

Here they are....

 Top side: pinwheel design using two different fabrics

Bottom side: single block of a coordinating fabric